How To Build A Buddha Bowl

I have never been to sure about the name "Buddha Bowl," but what I am sure about is that these vegan bowls always give me tons of energy. But really, who gave them this name? Ha ha, I kid I kid. I have been making renditions of my own lately, while on my 10-day Balanced gut reset, and wanted to share the key steps to building the perfect one! You don't have to be a vegan or even a plant lover to dive into one of these rainbow bowls, guaranteed to please the pickiest meat eater (a.k.a. ME!). So grab your biggest bowl and let's get going.

C1715B12-844B-4032-91D4-37BEBE6DB87D.JPG

The only way to make a Buddha Bowl is to start with the biggest bowl you have. You are going to be packing in nutrient dense foods and the more the better. I get asked a lot about serving sizes, so I am going to break it down for you.

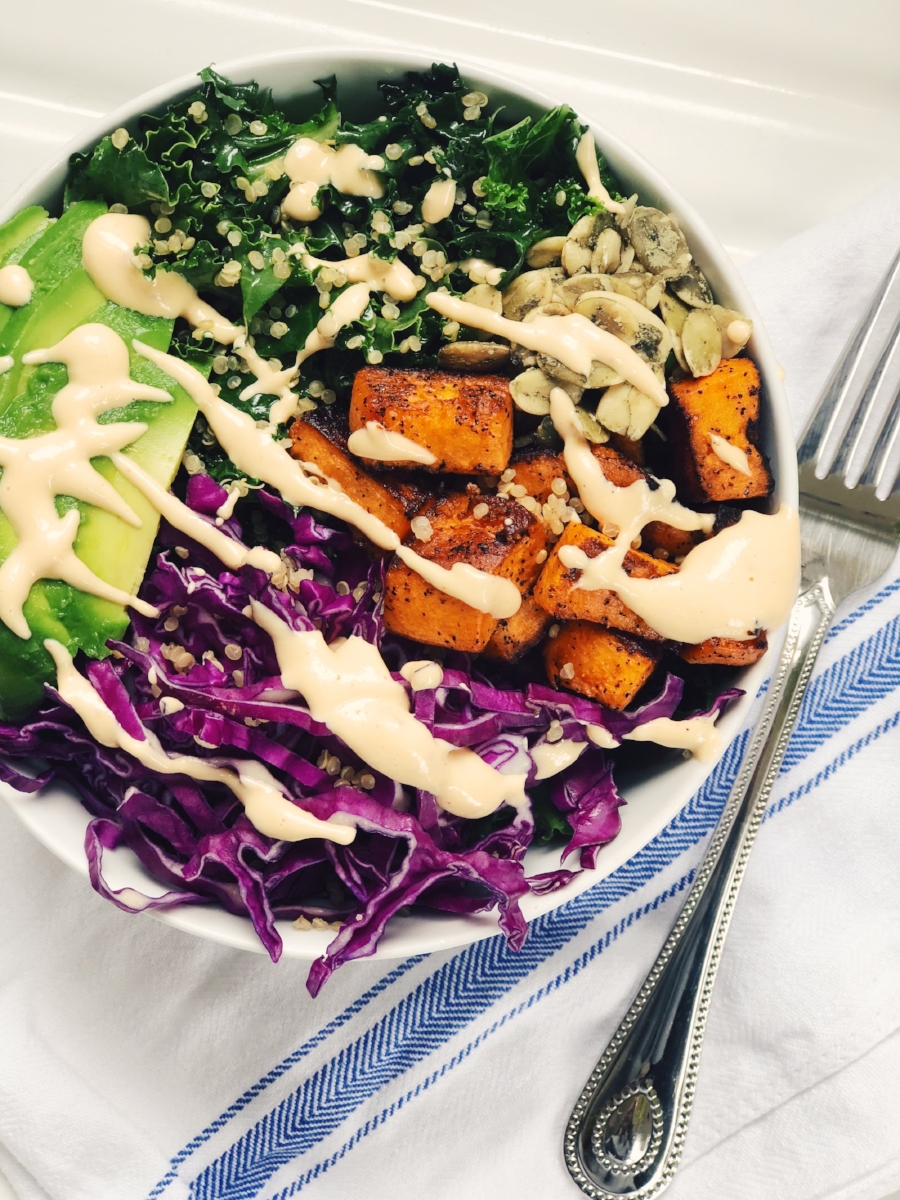
Let's start with the Buddha Bowl pictured above. Here are the five components that are key to making your bowl a stunner. 
BASE: Kale and shredded cabbage: 2 cups total
CARB: 2 tbsp. Quinoa + 1/2 medium Sweet Potato
FAT: 1/4 Avocado + 2 tbsp. pumpkin seeds
PROTEIN: 1/4 Cup Black Beans (added after photo) + Quinoa
SAUCE: Spicy cashew sauce

CREATE YOUR BASE:
A sort of greens will do - spinach, kale, arugula, mixed greens, dandelion greens. For kale, massage with juice from 1/4 of a lemon and splash of olive oil. Rub this "marinade" on the chopped kale with your hands until it start to soften. You can also use grains as your base - brown rice and quinoa are favorites. Recently at Whole Foods I found a blend of brown rice, quinoa, buckwheat and millet that cooks up in 15 minutes. The perfect addition to any Buddha Bowl. 

ADD YOUR CARBS:
When I say carbs, I mean gluten free grains or one of my favorite carbohydrate sources - sweet potato (hey hey paleo people!) Carbs are necessary for energy and can layer them in however you want in your bowl. I sautéed the sweet potatoes pictured here by peeling, chopping into cubes and cooking in olive oil on a cast iron skillet with chili powder, salt and pepper for 8-10 minutes flipping a few times.

ADD YOUR FATS:
I am a HUGE fan of fats. Especially fat sources that are rich in fiber like nuts, seeds and avocado. You can have tons of fun with your fat additions. Here I chose avocado and roasted pumpkin seeds. You could also do sunflower seeds or a sprinkle of hemp seeds.  For nuts, I love roasting up some chopped, almonds, walnuts or hazelnuts.  Cashews would make an amazing addition as well, I just so happened to use them in this bowl for the sauce. Hey yo!

ADD YOUR PROTEIN:
For a Buddha Bowl the trick is to pick a good plant based protein. If you are using beans or lentils, make sure you are adding a grain to get a complete protein (containing all nine essential amino acids). You can also cook up some tofu (non GMO brands I like are Hodo Soy and Wildwood) or fermented tofu, aka tempeh.

GET YOUR SAUCE ON:
This is where the flavor comes in and you have the choice to jazz it up any way that you would like!  For this bowl I wanted something spicy.  I used 1/2 cup of cashews and added 1/3 cup of water, 1/3 cup of olive oil, a squeeze of lemon and 1 tablespoon of sriracha (I like Wild Brine for a sugar and preservative free version). If you like creamy sauces, you can go with a Tahini Sauce - I love this recipe. I also really love adding pesto, Trader Joe's has a great vegan version, or make your own pesto sauce with avocado in it, here is my version that I am obsessed with. 

OTHER TOPPINGS?!
Go for it! Throw some sauerkraut or Kimchi on there for some probiotics. Maybe even some berries, really the sky is the limit to design you own so go for it!!


Colonics: The Good, The Bad and The Poopy

Alright, you asked and I deliver. I am talking everything there is to know about colonics, the benefits, how to prep and why I do them. If you have never done one before and are suffering from digestive issues, constipation, IBS, food allergies, candida, bloat or energy slumps you may want to consider a few colonics sessions after checking in with your naturopathic or functional medicine doctor.

Colonic Room at Body Harmony in SF

Colonic Room at Body Harmony in SF

But wait, hold up… someone puts a tube into my butt emitting warm water into my colon to release any blockages… SAY WHAT?! Does it hurt? Is it safe? Is it uncomfortable? What does it feel like? How do I prep? What should I expect afterwards? How often should I do them?

I am answering all of your questions and why colonics play a very important part in Gut Health and a balanced Microbiome.

THE GUT HEALTH CONNECTION
The most important thing we can do for our health is foster a healthy gut environment where healthy bacteria can grow and thrive. GUT HEALTH = GOOD HEALTH. If we don’t take care of our gut - everything from our colon (large intestine) to our small intestines to our stomach- our physical and mental health suffers as a consequence.

There are two sides of gut dysfunction – 1) Leaky Gut Syndrome and 2) Dysbiosis. In the first, when our gut’s mucosal lining in our small intestine starts to break down and the tight junctions between the cells become permeable, this allows nasty things (partially digested food, bacteria, fungus, etc.) to leak into our blood stream.  The medical community refers to this as Intestinal Barrier Hyper-Permeability and can cause all sorts of immune system responses such as food intolerances, allergies, autoimmune disorders, malabsorption, etc. The second side refers to an imbalance in the gut’s natural flora (our microbiome), which is known as Dysbiosis.

Dysbiosis can lead to chronic infections and once you learn what dysbiotic infections eat, you can start thinking about defeating them. Step one, remove items from your diet that feed any bad bacteria including processed sugars, processed flours and carbohydrates that convert to sugar.

Step two, properly flush your system. Our colon, or large intestine, is 5 to 6 feet in length and is responsible for absorbing water to form stools and eliminate from our body. If we suffer from Dysbiosis it is likely that this will lead to difficulties in proper elimination as studies now show. The intestinal microbiota helps to breakdown food into absorbable nutrients and prevents pathogenic bacteria from growing. When we have an imbalance of bad vs. good bacteria, this doesn’t happen, waste will literally become “stuck” and toxins will continue to build in our colon. 

WHY COLONICS + WHAT ARE THEY
For anyone who has read Love In The Time Of Cholera, (book nerd over here) then you know that enemas have been used for centuries to help with conditions such as constipation and chronic pain. Clean bowels helped patients heal better and faster. These days, we have upgraded to colonics.

Colon Hydrotherapy (aka, colonics) is a safe, effective method of removing waste from the large intestine. Filtered and temperature regulated water is infused into the colon, where waste is softened and loosened, resulting in evacuation through natural peristalsis. The inflow of a small amount of water and the release of waste is repeated several times in the process.

The removal of waste encourages better colon function and elimination. Colonic practitioners use specialized equipment that ensures an easy, odorless, and safe way of eliminating. Colon hydrotherapy is one of the most effective ways of cleansing the lower intestinal tract (colon) and detoxifying the overall system. 

There are both open-system colonics (where you are in the room on your own) as well as closed-system colonics (where the practitioner is in the room and helps to administer abdominal massage to help with release). Personally, I prefer the closed-system approach where the practitioner help to “fill and release.” I promise you it’s not weird, it’s very professional and if you want, you can look at all your waste being released!

Also, nope, colonics do not hurt. When the water is filling your colon you might feel a little pressure in your lower abdomen, and when you are releasing it just feels like you have to go to the bathroom really bad.

 PREPARING FOR A COLONIC
In order to have a successful and comfortable colonic session, prep is important. For at least 2-3 days before your session it is important to:

·      DRINK WATER! Your body needs water to digest your food and to get rid of waste. Drinking half your weight in ounces daily will help to soften you stool. Coffee, soda or flavored drinks do not count.

·      DO A GUT RESET. I recommend colonics to all of my clients who are doing the 10-Day Balanced Gut Reset. By taking daily fiber elimination drinks with psyllium husk on my reset, this further helps if you are particularly constipated.

·      EAT WHOLE FOODS. Make fruits and vegetables 50% of your diet and avoid any gas-producing foods (cruciferous vegetables, beans) and congesting foods (sugar, wheat and dairy). Also, it is very important to not eat or drink anything 2 hours prior to your colonic appointment so food is digested and you are comfortable

·      EAT MINDFULLY. Slowing down to chew your food until it is liquid in your mouth helps immensely with digestion. Although chewing isn’t the only thing that helps digestion, if you are curious about how to practice more mindful eating? Check out my guide of 8 Steps to Eat More Mindfully!

WHY I DO COLONICS, MY FIRST EXPERIENCE AND HOW OFTEN
I recommend going 1 to 3 times for your first round of colonics. When I first started doing colonics I hadn’t even started my wellness journey, and actually, doing my first round of colonics was the catalyst for me choose my path towards better health.  I was 23 when I went to a colonics practitioner for the first time in Huntington Beach. I had just had my gallbladder removed six months earlier and also polyps that were removed from my colon. I had gained weight, had no energy, my skin was having terrible breakouts and I was constipated – only going to the bathroom a few times a week.  My first colonics I did not prepare properly and was only able to eliminate gas bubbles. No waste. I remember feeling defeated, but then I went back for a second and third session within the next 10 days and SUCCESS! I never felt so amazing before. My energy was through the roof, my belly was flat and I was getting the most restful sleep.

Fast forward to today.  Combined with a diet of whole foods and eliminating the abundance of processed foods I ate years ago, I do colonics every six months to a year to keep things clean. I usually do colonics once for up keep (but I recommend 1-3 if this is your first time) and combine it with my balanced gut reset.

For me, colonics are a key piece for maintaining my health.  I notice that if I wait more than a year to go back for a session, I start to feel sluggish, my candida overgrowth starts to creep back in and my BM’s aren’t as fabulous and regular as they usually are. After improving my diet and by integrating cleansing and colonics, I haven’t been on any medications or had any recurring health or gut issues.

If you are reading this (... it's not too late. Thanks Drake) and you are constipated, feel sluggish, struggle with break outs, have bloat, gas or any recurring digestive issues talk to your Naturopathic Doctor or Functional Medicine Doctor about integrating colonics into your health routine.


Why Sourdough Bread is Good for You

I have always been a big supporter of sourdough bread. Meaning I regularly give money to a baker to provide me with loaves of gluten goodness. But my affinity for fat slices of fresh baked sourdough goes further. I wanted to understand (and therefore researched and read many studies) the biochemical processes that take place during sourdough fermentation. Why does this process make sourdough easy to digest? Why does some bread cause digestive discomfort and bloat? Why is sourdough healthier than ordinary or commercial breads? I'm answering these questions for you because let's face it, if science tells us to eat bread then you EAT THE BREAD. 

BD59ED1D-0A98-48F0-A44F-D0BB13354DAB.JPG

So why is sourdough bread good for you? The magic is in the sourdough fermentation and understanding two key words: Phytic Acid. This process of fermentation transforms the bread, increasing the bioavailability of key nutrients and boosting the nutritional content of the bread. The fermentation process helps to break down phytic acidbut why is that so important? 

Phytic Acid

First you must understand the simple anatomy of a seed and which components are important for digestion and nutrient absorption. All grains start life as whole grains. In their natural state growing in fields, whole grains are the entire seed of a plant. This seed is made up of three key edible parts – the bran, the germ, and the endosperm. There has been a lot of research done on the link of digestive disorders and IBS to bread, indicating that the storage of phosphorus in seeds is found in the bran part of wheat and is called phytic acid.

Screen Shot 2018-04-08 at 9.00.01 AM.png

 This phytic acid inhibits enzymes which are needed for the breakdown of proteins and starch in your stomach. When we lack these enzymes, this results in digestive difficulties (and looking 6 months pregnant after eating bread). This is why commercially processed whole grain bread (whose labels trick us into thinking they are healthy by using the words "whole grain") is often the worst thing that a person with a wheat intolerance should eat.  

A lot of us have been conditioned to believe that any bread that appears white in color must be bad, and bread that appears brown in color must be good. Right? WRONG. Read your labels. Most commercial wheat breads contain dough conditioners, added sugars, preservatives and emulsifiers to bake bread at a faster rate. These additives are also to blame for some people's wheat intolerance. So why is sourdough better than commercially processed wheat breads? The wild yeast and naturally occurring lactobacillus (oh hey probiotic) can neutralize the phytic acid, therefore making it easier to digest. These phytic acid molecules bind with other minerals, just as zinc, iron, magnesium and calcium which makes these important nutrients unavailable to us. 

Give me the nutrients!

Long and slow fermentation of wheat can reduce phytates by up to 90%. In studies, sourdough fermentation versus yeast fermentation showed a more efficient breakdown of phytic acid as well as nutrient availability. Simply put, the phytase enzymes released by the yeast as the dough ferments effectively pre-digests the flour, which releases the micronutrients and in turn reduces bloating and digestive discomfort. To add to that, sourdough bread also takes longer to digest; studies have shown that rye flour added to sourdough can help regulate blood sugar as well.  A total win for bread! Sourdough is also a prebiotic, which helps to support your gut microbiome. There are some incredible studies emerging regarding bread and nutrients, and we are increasingly becoming aware of the links between gut microbial diversity and the association with good health. With evidence based studies, this information becomes more practical in our minds to understand how sourdough can support your health. 

A Balanced Diet

Eating sourdough is just a part of what makes a healthy diet.  Adding more nutrient dense food to your diet, particularly fermented foods such as sourdough bread, makes the nutrient more available and easier to absorb and digest. Many of us believe that bread is the enemy and can cause not only digestive discomfort but also weight gain. What's important is the type of bread that you buy.  Make sure it is from a baker, not commercially processed, and contains minimal indredients (whole wheat flour, sourdough culture and sea salt). Lifestyle, immune system support, blood sugar management, weight management and good digestion are all manageable without cutting out the foods you love. So support your gut microbiome and your health and grab a slice! And as always, listen to your body first over what any study says or what I tell you on here ;)

How to Avoid Airport and Travel Anxiety - PACK LIGHT!

Anxiety and travel is one of the topics I talk about most with my clients. A lot of this is centered around food while traveling, and how to make the right choices. But the other side of anxiety comes with airport travel in general. Getting to the airport on time, getting through security quickly and that awful anxious feeling of whether or not there will be overhead bin space left for your bag. In this post, I am talking how to travel and pack light for any weekend trip to help ease some of your travel anxieties.

CFDE15BF-9512-4D49-93A0-4406316E4EC2.jpg

What you see in the picture aboce is my usual go-to luggage for a weekend trip (3 days, 2 nights). It has saved me from the crushing anxiety of finding overhead bin space and also saves me mula on crazy carry on and bag check fees. 

The bag on my shoulder is a regular Long Champ bag, but I have used other large purses as well measuring 12-14 inches by 18-20 inches. For a recent weekend in LA I brought with me: 2 pairs of pants, one jacket, tennis shoes, slides, 1 pair of yoga pants, 2 sports bras, 1 long sleeve shirt, 3 short sleeve shirts, 1 dressy shirt, 1 tank top, sunglasses, sandals, 1 small purse, toiletries, underwear and socks. On the agenda for the weekend was hiking, yoga, one fancy dinner, casual lunches, walking around and chilling. 

I’ve done weekends in Seattle, Vegas, Portland and even Thailand for 10 days with the same bag (I know, I’m insane but bathing suits and shorts don’t take up too much space!).

So here are my tips. 

1.    Pick a jacket that will go with every outfit that is a neutral color. I packed this Aritzia jacket for my LA trip and wore it on the plane. 

2.    Pants - bring one pair of jeans and one dressier pair or a jumpsuit. I wear my jeans on the plane. I love traveling with a black jumpsuit for its versatility from day to evening.

3.    Activewear - I’m usually fitting in hikes and yoga sessions in my weekend trips. For this I always pack my black yoga pants and two sports bras. I roll these and tuck into any gaps in my shoulder bag. 

4.    Shoes - if you are packing tennis shoes these will take up the majority of your bag without being able to fit other bulky shoes. In this instance, you can wear an easy pair of slides like I have pictured here from madewell (great for day to night with cropped black pants or jumpsuit). Or you can wear your leggings and tennis shoes on the plane and pack your slides plus a pair of heels as well! Sandals are easy to tuck flat in your bag. 

5.    Toiletries - this is key. I bring a small bag that fits deodorant, face moisturizer, toothpaste, toothbrush, mascara, tinted moisturizer, concealer, blush and lipstick. I don’t pack shampoo, conditioner, lotion or body wash. For these items I rely on hotels to provide or friends who I’m staying with.

6.    Buy a cute laptop case (mine is from Society 6) and slide your wallet, phone, headphones and book in there too as your “carry-on” purse. 
 

There you have it! I get a lot of versatility with the mix of items I have listed above. Also, for going up and down escalators to get to terminals in a hurry, you don't have to stand with your luggage, you can walk past every one and up the escalator quickly to get to any connecting flights. Bonus! I will also note that any cold weather travel is much harder with only a large shoulder bag and for these weekend trips I pack more or wear one big jacket onto the plane, layering is key! ;)  Happy traveling for all your fun summer trips!


How I Eat is None of Your Business

It took me a long time to be able to say this out loud. Every time I would sit down to a lunch, a dinner or go to a happy hour I would get the same questions.  How come you are not drinking? Why do you always have to make your order so confusing? Well, aren’t you a picky eater?! Why won’t you just eat what we are all eating? Maybe this all sounds familiar…

DDB0A76B-2366-4425-A5C2-47F75209B443.JPG

At first, the people pleaser in me always wanted to provide an answer. To make them feel more comfortable about my food choices. I would get asked a lot by my old work colleagues if I was pregnant when I didn’t drink at events. (Totally inappropriate to be asked of a woman by her male colleagues, by the way.) Sometimes I would secretly ask the bartender to put my seltzer water in a cocktail glass with a lime so I could appear to fit in and to steer clear of the inevitable questions or side comments.

Food was a whole different issue. My ex-husband would always apologize on my behalf to the waiter or waitress at restaurants when I would ask for dishes to be prepared a certain way (yup, really. Emphasis on the EX). For catered lunches at work I would bring my own food to large meetings, which would lead to comments like “are you too good for the food we ordered?”  On most occasions, I felt like I had to just eat the dang sandwiches that were full of processed ingredients, and maybe feeling shitty for the rest of the day was worth it to dodge bullets from colleagues.

With friends, it was even more difficult. I switched to eating whole foods free of processed ingredients and cut back on my drinking big time at the age of 24 after suffering major health trauma. I was living a lifestyle of binge drinking, late night Frito Pies and microwave burritos. At one point, I was even convinced that I wanted to be a party promoter. So, imagine telling your party and booze loving friends that you aren’t drinking as much anymore and prefer to now make your burritos from scratch with brown rice and veggies on a sprouted wheat wrap. I got a lot of blank stares and went through a period of total isolation.

What I wish I would have said to many people from my past, and what I practice now, is that how I choose to eat is really none of your business.

And I don’t mean that literally. I am obviously making everything that I eat your business because I post about it almost daily on Instagram. What I do mean, is why I make the decision to eat the way I do is not your business. I don’t need to provide an explanation for why I choose to base my diet on whole and real food. I don’t need to justify why I don’t eat certain ingredients or why I ask so many questions about what’s on the menu when I go out to eat.

Let’s face it.  FOOD IS PERSONAL.  There is no getting around it.

Vegan. Vegetarian. Gluten-Free. Soy-Free. Dairy-Free. Paleo. Low-Carb. Keto. Clean Eating. Plant-based. We have spent decades placing labels on certain diets. And as more and more people develop food allergies, intolerances and digestive disorders we have to continually adjust the way we eat, cook and order at restaurants.  Recent studies point to the rise of C-section birth, use of antibiotics and overly sterile environments – all of which negatively affect our microbiome and our body’s defenses.

Then there are those like me who also eat for good health. Eating whole foods and real ingredients makes me feel alive, gives me more energy, balances my hormones and, more for purposes of vanity, has provided clear skin and a weight that has never fluctuated over a few pounds in the past 10 years.

Putting a label on the way that you eat inevitably leads to stress, anxiety, guilt and shame from being put in a box and feeling like you cannot step outside of it. It can also make you less accepting of others who choose to eat differently than you.  We forget that just as we made a choice to eat a certain way, so have others, and we should mutually respect that. Vegans attacking those that choose to eat animal products. People who label themselves “clean” eaters, therefore creating a certain stigma that eating any other way is “dirty.” We have all been guilty at one point of being judgmental of others food choices, while also feeling judged by others.

As young females, you are considered “cool” if you can eat a whole box of donuts, take down an entire pizza or drink a six pack of beer while still maintaining a thin waistline. It has become celebrated how shitty we can eat while still fitting the mold of magazine cover models.  I call bullshit on this. 

As a child of the 80s I had access to packaged and processed food out of convenience for my parents who both worked full-time jobs.  They did their very best to provide me with healthy lunches, but as a young kid it pained me to see my friends eating pizza at school while I ate my homemade sandwich and carrot sticks. Growing up, food was even a way of fitting in. It was everyone’s business at lunch hour to know exactly what was in your lunch box.

I have clients of mine who struggle every single day with making healthy choices that work for them.  Or even wanting to eat a pizza or cookies without fear of judgement. Not because they are unsure of a healthy lifestyle, but because they are unsure of reactions from others. How to balance eating what is right for them versus a fear of what other people may think of them.

So how do we move away from food and diet stigmas? Away from labels and judgements? To be able to eat what we want that works for our body, and for that to be celebrated and supported by others. In my opinion, the further we move away from and stop using food labels, the sooner we can all accept each other’s choices. Because really, how we eat and why we choose to eat the way we do is no one’s business but our own.

How to Make the Perfect Smoothie

If you can’t tell already, smoothies are my jam.  I am borderline obsessed. I pretty much make one every morning for breakfast, except when I go big with an egg, bacon and waffle breakfast. In my humble smoothie loving opinion, smoothies have it all.  They combine all you need for a balanced breakfast into one glass. You get your veggies, fruits, proteins, healthy fats and superfoods/adaptogens all together in a creamy morning treat.  In this post, I am breaking down each category for you, including how to prepare, store and use certain fruits and veggies to get the most out of this breakfast powerhouse.

9C9CC5E1-E3CC-4462-9D42-4A35E9D9F26C.jpeg

LIQUID BASE
1 to 1 ½ cups

Alright, this is where the magic begins. I typically choose a non-dairy base for the morning, but I have including some options for full-fat dairy as well. For one serving I typically do 1 cup to 1 and ¼ cup of liquids. 1 ½ cup when working with all frozen fruits and vegetables and 1 cup when working with a mix of fresh and frozen. The amount of liquid will help determine the creaminess and thickness of your smoothie.

I find cashew milk to be the least disruptive in terms of taste but I also love any nut milks including almond, macadamia nut and coconut milk.  Oat milk and hemp seed milk are coming more out on the market now but it’s hard to find a good brand free of sweeteners. Personally I find it easy to make nut and seed milks from scratch. 

Cashew, hemp, sunflower and pumpkin seed milk only require soaking and blending with no straining.  Walnut, hazelnut, almond and brazil nut milks are my favorite to make, strained through a nut bag or cheese cloth. The nut pulp can be used to make energy balls! Fresh, homemade nut milks last in your fridge for 3-4 days.

If you are partial to dairy in your smoothies I suggest a good full fat milk made from grass-fed cows or using full fat regular or greek yogurt.

VEGETABLES
1-2 handfuls

The key to adding vegetables is to not use more than one or two. Due to the fiber content in vegetables and the addition of using fruits, combining too many vegetables in a smoothie may be hard to digest and causing you to run to the toilet. Oof.  We don’t want that. Below I have listed my favorite veggie combinations along with how to prepare and store.

Zucchini – wash and slice into 1-inch coins.  Zucchinis are easier to digest than more cruciferous vegetables and can be used in your smoothie raw or cooked.  For raw, simple toss into a reusable container in your freezer.  For cooked, you can blanch in boiling water or steam for 2-3 minutes. You cannot taste in smoothies and adds a nice thick texture.

Leafy Greens (Spinach, Romaine Dandelion or Kale) – can be added raw. I wouldn’t add more than a handful of each for easier digestion. For any leafy greens, store in your refrigerator wrapped in a paper towel to absorb excess moisture and keep fresher longer.

Cauliflower – wash and slice a head of cauliflower or buy pre-sliced in the frozen section. I suggest that you cook your cauliflower, you can blanch in boiling water or steam for 2-3 minutes.  Let cool before freezing or lay flat to freeze so the florets don’t stick together. You cannot taste in smoothies and adds a nice fluffy texture. I wouldn’t use more than a handful.

Beets – if you are buying your beets raw, you can roast in your oven or cook in boiling water.  When you are able to pierce with a fork, remove from oven or water and peel off the skin.  This is easily done by rubbing a paper towel over the skin. Slice into chunks and let cool before freezing or lay flat to freeze so that the chunks don’t stick together. Store in a reusable container in your freezer. You can also find precooked beets in most grocery stores as well.

Squash or Sweet potatoes – I love using squash and sweet potatoes in smoothies. They thicken the smoothie and add a creamy texture and sweet taste.  I have used both delicate and butternut squash. Both by roasted before hands and removing the skins.  Yellow squash is easy to use too, and prepared just like zucchinis. For sweet potatoes, I roast in the oven at 375 degrees until tender enough to be pierced with a fork.  Remove, let cool, remove the skin and slice into chunks to be frozen.

Carrots – Prepare the same way you would zucchinis as described above, but make sure you peel beforehand.  

You guyzzz, I didn't go to design school

You guyzzz, I didn't go to design school

FRUITS
1-2 handfuls

A few weeks back I posted about the fruits and veggies that are more important to buy organic than others. When buying fruits and veggies for your smoothies, I would follow the lists that I posted.

I have listed fruits from least to most sweet and like veggies, I believe that a combo of one or two is just enough.  Check to make sure when buying frozen fruit that the only ingredient is the fruit! Believe it or not, a lot of brands add sugar and color.

All berries – blueberries, strawberries, cherries, blackberries, raspberries

Green apple – I love slicing up a green apple and adding to smoothies with the skin on for the most fiber content. For my favorite green apple smoothie, subscribe to my newsletter to get 5 of my favorite smoothie recipes.

Papaya and Pineapple – Digestion powerhouses, both of these fruits are wonderful to aide in digestion.

Peaches and Nectarines – best when eaten in season but can be found frozen

Mangoes and Bananas – these two tropical fruits will help to make your smoothies more sweet and creamy. My tip for freezing bananas is simply to cut them in half and store in a reusable container.

Pitaya or Acai – will lend a bright color and creaminess and can be found in packets in the frozen section.

HEALTHY FATS
¼ to ½ ripe avocado
1-2 tablespoons of nuts or seeds

Alright, now we are getting to the best part of smoothies, healthy fats! These are so important in the morning to wake your brain up (the brain is made up of 80% fat, so feed it fat!) and to help keep you full until lunch.

When it comes to fats, I would stick to just one or maybe two in your smoothies.  Start with one and work your way up from there!  Fats are the most calorie dense foods at 9 calories per gram so they help to fill you up faster and longer.

Avocado – This powerhouse fruit is rich in fiber and healthy fats.  For one serving I recommend ¼ to ½ and avocado for a smoothie.  This is also the best ingredient to add in place of a banana for creaminess.

Coconut oil or coconut butter - Love adding coconut oil or coconut butter for a healthy hit of fat.

Seeds – hemp, chia and flax seeds pack in not only healthy fats but omega-3’s.  I always keep these in my fridge to last longer and use 1 to 2 tbsp. for one smoothie servings.

Nuts and nut butters – I love adding nut butters to my smoothies, they pack in protein and healthy fats. I love using creamy almond butter or cashew butter. I also love sunflower seed butter. Make sure to buy all of your nut butters with no added sugars or oils.  The only ingredient in your nuts should just be the nuts! 

2BEB3CD4-4CBA-4119-B610-FA57F2917888.jpg

PROTEIN
1-2 scoops

You can use 2 tablespoons of nut butter for your smoothie protein (about 7 grams) or you can go the protein powder route to get more grams of protein in the morning! Good protein powders will provide you with essential amino acids to help keep you fuller longer so you don’t have to snack before lunch!

I am listing my favorite protein powders below including links to buy. These are in heavy rotation for me as well as recommended to my clients. I like these brands for their minimal ingredients that are free of any added crap.

Nuzest Protein – I like the original, unflavored
Use code BALANCEBYMOLLY for 15% off

Sun Warrior – I like the vanilla flavor that I linked to

Collagen Peptides – I like Further Food brand best (not vegan)
Collagen is great for hair, skin and nails and also contains gelatin which is very healing for your gut!  Use code BALANCEBYMOLLY for 10% off

Philosophie – I like the Cacoa Magic or Green Dream


SUPERFOODS
Serving size on package

Last but not least, superfoods! There are a ton out there on the market, including adaptogens which are great for stress, anxiety and sleep.  Here are the ones that I use in smoothies but feel free to explore more for yourself! Click on each one for link to the product I use. 

MACA
CACAO POWDER
SPIRULINA
MUSHROOM BLEND


BLENDER
I use a Vitamix blender to make all of my smoothies. I get asked a lot which blender I use.  I bought mine refurbished on Amazon which saved me tons of money and I swear it was brand new! Never pay full price ;)

HERE IS THE BLENDER I USE

Happy smoothie making! 


Gluten-Free Lemon Ricotta Pancakes

I have to admit that I am not a whiz in the kitchen. I don't follow recipes well and I have been known to set off fire alarms. Making easy bowls are my jam. Sandwiches, eggs, meatballs, any sort of throw together meals... I got it.  But complex baking feats? NOPE. Which is why to my surprise, these gluten-free lemon ricotta pancakes turned out PERFECT. Seriously, the best pancakes I have ever made.

EA031C43-F480-419C-BBE6-09D516B58A64.jpeg

That's not to say that this recipe was without injury (I "zested" my thumb while zesting lemons), burnt pancakes (I burned the first batch of pancakes like a true pro. NOT.) and exhaustion from whipping egg whites into peaks by hand (not recommended, but possible!).

Despite some hilarious mishaps, this recipe was easier than I thought it would be, and I didn't burn the kitchen down! The pancakes are perfect and fluffy thanks to the ricotta cheese and egg whites that I managed to eventually whip into peaks. Emphasis on EVENTUALLY. Time for me to get an electric mixer. Oy. 

If you are looking for pancakes that impress and don't require a lot of effort (ahem, with an electric mixer), then these are for you.  They are light, airy and the lemon makes these so freaking good! Make these immediately. 

This is what the batter should look like while slowly stirring in the egg whites

This is what the batter should look like while slowly stirring in the egg whites

HERE'S WHAT YOU NEED:
4 eggs, separated (I used pasture raised)
1/4 cup coconut sugar
zest and juice of 1 lemon
2 teaspoons vanilla extract
3/4 cup whole milk ricotta cheese (I used Bellwether Farms brand)
6 tablespoons whole milk (I used A2 organic brand)
large pinch salt
1/2 cup sifted gluten-free flour (I used King Arthur brand)
butter, as needed (about 4 tablespoons)

HERE'S WHAT YOU DO:

1. Preheat oven to 200°F (for keeping pancakes warm while you cook in batches)

2. In a large bowl, vigorously whisk together egg yolks, coconut sugar, and lemon zest until thickened, about 2 minutes.

3. Add vanilla, ricotta cheese, lemon juice and whole milk; mix to combine.

4. Add sifted flour and mix again to combine. I used a fine mesh strainer to sift. 

5. Meanwhile, in a separate bowl, beat egg whites with a pinch of salt until they hold stiff peaks. I recommend an electric mixer for this process. Lesson learned. 

6. Fold 1/3 of the egg whites into the batter to lighten the mixture, then fold in remaining egg whites being careful not to deflate them. 

7. To cook the pancakes, heat a non-stick pan, pancake griddle or cast iron pan over medium heat. Add 1-2 tablespoons of butter to the pan and when melted, spoon the batter into the pan making  3-inch pancakes. Allow to cook for three minutes (or until the bottom is nicely golden), then carefully flip the pancakes and cook another three minutes on the second side (or until nicely browned on both sides and cooked through in the center).

8. Remove pancakes from the pan to a plate to warm in the oven while you continue to make the pancakes.

9. Serve the pancakes with warm blueberries and maple syrup

This batch makes a lot of pancakes - I got 16 pancakes but depending on size you could have a few more or a few less.  Also depending on how many hungry people you have, you can definitely throw leftovers in the fridge for up 2 days in an airtight container to snack on later. 

Happy pancaking!!


Master Your Time: 3 Tips for Managing Your Schedule as an Entrepreneur

Do you work for yourself? Want to develop a better routine for work? As an entrepreneur, mastering your time for efficiency and productivity can be simple, but it is important to discover what works best for you!         

Before I started my own nutrition practice I worked in corporate America as a banker in technology finance. I used to have weeks where I felt like no matter how many items I checked off of my to-do list, they would keep piling up and the list would get longer and longer. Some mornings I would come into work and stare at my to-do list not even knowing where to start, thus triggering bouts of high stress and anxiety.  Anyone feel me on this? Simply put, I wasn’t managing my time well.

6D57D738-9298-4A2D-8674-0BF68D45121F.jpeg

Fast forward to quitting my banking job and setting out on my own. One of the unexpected hurdles that came up during the first few months of working for myself was, how the heck do I manage my time? I had a million things I wanted to do. Client scheduling, sessions and follow ups. Marketing on social media, newsletters and blogs. Partnerships and community events. Corporate wellness, office hours and nutrition talks. The list goes on and on.

It took a lot of time to figure out my new routine, when to schedule clients, how to schedule clients, and even things like when my brain was most focused and efficient and also my sleep schedule. Now that I don’t work a 9 to 5 I am able to maximize hours for when my brain turns on (late afternoon and evenings) versus when to focus on more menial tasks that don’t require a lot of brain power (mornings).

I have put together my 3 tips for managing your schedule as an entrepreneur like a pro.  These have worked tremendously for me and I highly recommend trying one or all three to see how it works for you!

ESTABLISH A MORNING ROUTINE

As an ENFJ I need structure and as “the most introverted of extroverts” I also need quiet time. I understand that what might work as my routine can be very different for others, but what is important is establishing your own in the morning.  Setting a routine in the A.M. is so important for how we spend the rest of our day.  As an entrepreneur, it is likely that you will have many opportunities thrown in your direction at once, so having a daily routine can help to ground you and give you some much needed time for yourself.

I am a late riser.  My internal alarm clock is set to 8am. My boyfriend is usually up in the morning and on his way to work by then. Most days I don’t leap out of bed right away. I take some time to stretch my body laying down or I do a quick 1-2 minutes of Dr. Andrew Weil’s breathing exercise which helps to center me before starting my day.

My first stop in the morning is the kitchen. I heat up water on the stove to pour into a big 16 oz. glass with a giant squeeze of lemon.  Warm lemon water is my “coffee” and gives me energy, cleanses and alkalizes my system and gets me ready for the day. I then sit on my couch and enjoy this warm cup of goodness while I check my calendar to prep for the day and time-block for the next day (see below). I then answer any urgent emails and leave the rest for later.

Back in the kitchen I am making a smoothie for breakfast.  This work for me as it is such an easy way to get a dose of vegetables, protein and healthy fats in the morning. I take this smoothie to my desk in my home office and dive into my emails first thing. Clearing out what I can in the morning helps me feel like I can concentrate on other tasks for the rest of the day.

The last part of my morning routine is getting exercise. I usually take a 10am yoga class a couple blocks away from my house. On days that I am taking clients at MNT Studio I will take an afternoon class there. Exercise is such an important part of my routine and if not yoga or pilates I am walking around San Francisco for at least 20-30 minutes a day. 

TIME-BLOCKING

To be honest, I don’t know how I would function without time-blocking.  Never heard of it?  No problem, let me break it down for you. A big part of creating a daily routine is to block time for certain tasks.  If you are like me, and struggle to stick to a routine and find your mind wandering from one idea to another then time blocking will help balance your time.  Sometimes I even schedule a time for when I just let my mind wander! I put this down on my calendar as “do not work.” But I have to admit that structure doesn’t always rule my day, so being flexible is important as well.

Here is how it works:

Time blocking is the act of scheduling sessions of work and different tasks on a calendar. By deliberately assigning work time on your calendar, you automatically acknowledge the immutable resource of time. Here is an article I love on time blocking from Fast Company.

Some people schedule every planned task throughout the day and completely fill their calendar.  Others, like me, allow for flexibility if other things pop up. Flexibility and buffered time are part of my planning process as is the time to do the planning itself. I also find a huge benefit in time blocking tasks that require more brain power for later in the day when my brain is more turned on.  This is also why I take my clients in the afternoon and early evenings.  

I do not time block every day. When I find it most useful is on days when I don’t have clients and I am left to my own devices. Here is a sample of my Friday that helped me stay focus towards the end of the week so I can relax and take my mind off of work for the weekend.

IMG_8419.jpeg

Also, a final note on time blocking if you plan to try it out. I would recommend figuring out a way to become productive with your work before you start time blocking your work. In order to do it well, you need to work first on time management, and honestly what I find works best with time management is cutting yourself some slack. Know how to adjust and buffer throughout the day. Don’t schedule to many tasks.  Stick to 2-3 important ones. Practice acknowledging interruptions from the self and the world and have a sense of what exceptions work and don’t work for you. 

SETTING BOUNDARIES

Deciding to limit how much I work has been key for keeping my sanity. When I first launched my business, I didn’t set boundaries on when I worked and what I did when. This eventually led to being frustrated when I found myself working on weekends and also guilt whenever I had any free time and I wasn’t working.

When I put limit on the hours I worked, this changed everything. Time-blocking my day helped me immensely with setting boundaries since they literally became tangible tasks on my calendar. Establishing a morning routine that didn’t involve me opening my computer or phone first thing was key as well.

Setting boundaries also includes setting a schedule for each week that works for you. As an entrepreneur, you have to make money in your business to survive and to keep on doing the work that you are passionate about. To me this meant taking clients when I could get them, any day of the week and any time. What I realized after the first couple of months was that this wasn’t efficient for all the other work that goes into running a business and didn’t help me maximize my time. After trial and error, I settled on taking clients only three days a week in certain time blocks and used the other two days of the week for marketing, writing, meetings or to relax over a long weekend.

As a nutritionist and wellness coach who also wants my clients to be successful, I allow for unlimited emails in my programs. In the beginning, I would reply to emails as they came through, even if I was out to dinner or after 11pm. Setting boundaries like responding within 24 hours to all emails allowed me to be more present in my life.

Take the time to play around with what works for you with setting boundaries, setting a schedule and setting up a routine. Make time to be present in your life and find balance for getting work done and spending time with yourself and those that you love. After all, if you have also left the corporate world to become an entrepreneur, isn’t that what it is all about?


How important is it to buy organic fruits and vegetables?

I get this question a lot, and it is one I used to ask myself whenever I went grocery shopping and would balk at the price of an organic apple being over one dollar. Therefore, I did what I always do when I don’t have the answer, I investigated and educated myself on not only how important it is to buy organic and why, but also which fruits and vegetables are more important to buy organic versus others.  I am compiling what I found here, just for you!

927E614C-36F4-4223-AC65-79BDAEECDE09.jpg
E1AB1B52-94E6-4DAB-B0B9-3FBF0ACD08F1.jpg

In my opinion, having a diet that is rich in fruits and vegetables is so important that I would rather have people eat non-organic / out of season / not local produce than not eat any at all. Especially if one dollar organic apples are not in your budget, or you live somewhere with a short growing season and long winter. Many people can’t afford to buy all organic all the time, and therefore it helps to know if it’s worth to pay extra for that apple or head of cauliflower.

The good news is that you don’t have to buy all organic produce to reduce your exposure to contamination. This list from the Environmental Working Group gives you the inside scoop on which fruits and vegetables contain the most chemicals and which ones are least contaminated so that you can make an informed choice to buy organic or not. I use it when shopping to help put some money back into my pocket.  Also, my basic rule of thumb when buying organic is to spend the money on the foods I eat the most.  For example, if you are eating berries and cucumbers every day then buy organic.   

Familiarize yourself with are these two lists:

THE DIRTY DOZEN a.k.a. the twelve most contaminated:

1.     Apples
2.     Celery
3.     Tomatoes
4.     Cucumbers
5.     Grapes
6.     Hot peppers + bell peppers
7.     Nectarines
8.     Peaches
9.     Potato
10.  Berries
11.  Collard Greens
12.  Kale + lettuce


THE CLEAN FIFTEEN a.k.a. the fifteen least contaminated:

1.     Asparagus
2.     Avocados
3.     Cabbage
4.     Cantaloupe
5.     Sweet Corn (be wary of GMOs and buy local)
6.     Eggplant
7.     Grapefruit
8.     Kiwi
9.     Mangoes
10.  Cauliflower
11.  Onions
12.  Papaya
13.  Pineapples
14.  Sweet peas
15.  Sweet potatoes

And what about fruits and vegetables that are not on these lists? Like bananas for example? I label bananas as peeled fruits, like mangoes, avocados and kiwis, and therefore I don’t typically buy organic.

Although one thing to think about with peeled fruits is although the thick skins may spare you from significant pesticide exposure, it is possible that large amounts of pesticides and herbicides are used on the farms from which these originate, contaminating groundwater, promoting erosion and also possibly damaging local ecosystems. To help keep contamination out of your food and the environment, it’s best to buy organic when you can. Educate yourself and make smart decisions about your food.  Your health will thank you!


How I Left Corporate America (and why you should too)

This is a post that I have been wanting to write forever, but first, I actually had to leave my career in banking.  To be honest, this wasn’t an overnight decision. Instead it lingered in the back of my mind for many years.  It started as a “wouldn’t it be cool” idea if I could actually build a business doing what I love – helping people eat nourishing food to improve their health.  I never thought it would be possible to turn my passion into a business.

leaving corporate america photo.JPG

I worked in corporate banking for 13 years underwriting and structuring debt for technology companies in San Francisco and Silicon Valley. It was the longest “relationship” I had ever been in, and breaking up was hard to do. Because for a long period of time I loved banking. While other young girls dreamed of being veterinarians and ballerinas, at a young age I dreamed of being a business woman wearing a black suit and carrying a briefcase down Wall Street (just ask my mother about this). I didn’t make it to NYC, but climbed my way up the ladder in Los Angeles and San Francisco as a woman determined to break the glass ceiling. I loved the pay checks, I loved the bonuses, I loved the perks and I especially loved the creativity of structuring debt and proving myself to rooms full of white-haired men over and over again.   

Overtime, as with anything painted in glittery gold, the appeal of banking lost its shimmer and I began to see the cracks in the pavement as I continued down the road of my corporate career.  Three years ago I landed at a large institution, one of the biggest banks in America (by assets), and this is where my long term relationship with banking began to reach its imminent end. Compounded by my marriage that ended during my tenure here, I started to re-evaluate what it was that I truly loved about my career.  I noticed that things that were once important to me – money, status, nice clothes, expensive trips – were no longer my priority. They were no longer ME. Or maybe, I thought, just maybe this lifestyle never really was me.  It was time for a change.  It was time to become me again.

I have always been a hippie at heart. I actually hate using a hairbrush, I never really enjoyed wearing a lot of makeup, I could eat crunchy granola, beets and kale every day, and horoscopes and moon phases are pretty much my favorite things to talk about.  But my absolute favorite topic, that lights me up and will get me talking for hours, is about the power that eating whole foods has to change our health. I won’t crowd this post with my own story about my health and wellness journey, but I have seen firsthand the effects that food can have on your body and your mind. I have suffered through the negative effects of a diet based off of processed foods and have since discovered the health benefits of eating a diet of real food.

I have always “coached” family and friends on their own diets and how to make healthier choices, and people started to encourage me to make this into a career. After many years, I started to listen and then used the power of Google to find the Institute for Integrative Nutrition in New York.  They offer an online certification for health and wellness coaching and I knew this was the next step that I needed to take. I also started to spend most of my time on weekends writing my business plan and materials for my own practice. It took me one year to finally enroll in IIN, thanks to a huge push from a friend of mine, and then it took another six months to convince myself that I could actually do this.  I starting practicing on coworkers and friends, using my own health forms I had created and my personal knowledge I had built over 10 years of how to formulate a diet of whole foods without restrictions, calorie counting or portion control.

I started an Instagram account for fun to document the food I was eating and to share with friends. This is when things started to change. I met an amazing group of like-minded individuals who cared about the real food movement as much as I did, and for the first time in a while I felt understood by my peers.  In banking, I never felt wholly accepted or comfortable in a world dominated by men, long hours and unhealthy habits.  Whenever I brought a green smoothie into work with me in the mornings, or ate a kale salad at a group luncheon, I always received strange looks and back-handed comments disguised as jokes. Another huge reason to move on from your current career, is when you start to struggle with how to relate to your peers.

Me in my office on my last day of work, can you see the joy radiating on my face?!

Me in my office on my last day of work, can you see the joy radiating on my face?!

One of the most important things, and what I always tell others who are trying to leave their career and start a new one, is to immerse yourself in a community of others who are currently in your dream career. Don’t be afraid to ask for help, for advice and for lunch dates to pick someone’s brain.  People who are equally passionate about what they do, will open up and share their stories and offer you amazing advice and help. I am truly thankful for everyone who has been my supporter on this journey.

Having support is one thing, but believing in yourself and that you have the ability to create something out of your passion is what is most important and key for making the leap. At first, I was so fearful of not being able to be successful in another career. I was questioned by those close to me how would I make money and support myself? I second-guessed myself for leaving what others thought was a great career. I began to question myself and self-doubt reared its ugly head for the first few months.

The I remembered what an older female colleague and mentor told me once, “Do what you love and the money will follow.” So step one, BELIEVE IN YOURSELF. If you are good at what you do in your current job, imagine the possibilities in a job you love.

Step two, here is a worksheet and video with my top tips before you make the leap.

And with that I will leave you with a quote from Mr. Steve Jobs: “The only way to do great work is to love what you do. If you haven’t found it yet, keep looking. Don’t settle. As with all matters of the heart, you will know when you find it.”